Over the last couple of days, I’ve been working through the CWC+ “Design Collection” – a series of videos introducing design aspects. We have covered some of this before, so I haven’t sat through all of the videos. In particular, JC’s videos involving Figma are at such a pace that I don’t believe there’s much more to learn there than that which he’s shown us before.
For the final video, Chris from CWC+ invites Mark Moeykens from Big Mountain Studio to add animation to the old Slots game app that we created back in the beginning (so far back in the beginning that I didn’t blog much about it!). I’m always excited about animating the visual aspects from code – who wouldn’t be? – so this was a great incentive for me to watch all of the videos in this collection, knowing there’d be a great finale.
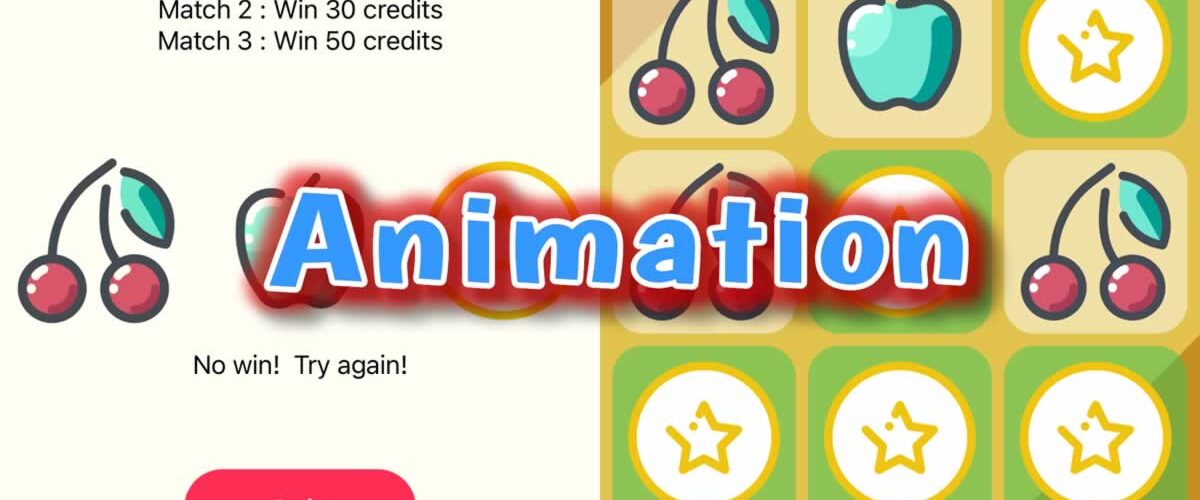
However, the “great finale” came as a bit of an anti-climax because the app Mark was given to work on wasn’t anything like the one we’d created a few months back.
See if you can spot the subtle difference:

So, Mark happily begins his animation tutorial whilst this student is sitting dumbfounded trying to figure out what happened.
I looked in the supplied Resources for the Xcode file that represented this new version of the Slots app, but it’s not provided. I spent an hour or two jumping through Mark’s video trying to see and hand-copy the code for this version of the app, but much of it can’t be seen (due to folded code segments).
After another hour or so of hunting around, I found a video from Chris Ching on YouTube that takes the viewer through a version of the “Slots” app that’s a combination of the two (it has the tiled elements, the coloured background, but only three elements like our original app). More hunting around revealed another YouTube video from Chris in which he walks us through changing his three-tiled app into the newer nine-tiled app.
After finding that video, I sat through it making all of his changes to my app (whilst removing my own enhancements) in order to come up with an app that’s similar to the one Mark uses in his tutorial. After about a day, I can now learn animation from Mark. Hurrah!
Such is the ever changing nature of Xcode, Swift UI, and iOS that we immediately run into another stumbling block. Mark shows how easy it is to create an animation by adding the following code to the main ZStack:
ZStack {
    ...
}
.animation(.easeOut)
Easy huh? Whoa, there, SwiftUI student! Not so fast. Try that code and Xcode will kindly tell you:
We're in the era of iOS 15 now - it's not going to be that easy for you, junior!
Urm, okay, Xcode doesn’t say that but it may as well do. It actually says:
'animation' was deprecated in iOS 15.0: Use withAnimation or animation(_ :value:) instead.
I’m sure this error makes perfect sense to seasoned coders, but to newbies like me it’s of no help whatsoever. Saying “Use withAnimation” with no clue how to “use” it is code for “go pull your hair out in frustration at our annoying error messages!”.
Fortunately, I’ve encountered this before in some of Mark’s previous projects and the solution is relatively straightforward. At least straightforward enough that Xcode could have given us more of a hint of what to do.
When using withAnimation, it’s necessary to know what action is to be handled “with animation”. In our instance, the user is tapping a button prior to the results being processed. So, we can add withAnimation to that, as below.
Before:
Before:
Button("Spin"){
    self.processResults()
}
After:
Button("Spin"){
    withAnimation {
        self.processResults()
    }
}
That’s it. Now we’re achieving the same effect that Mark achieves with his .animation modifier. (Note, as we have two buttons we need to add the above code to both of them.)
Now, after a day and a half of figuring out how to begin this lesson, I’m finally at the “5 minute” mark of Mark’s tutorial. I hope the remaining 15 minutes will take … well, about 15 minutes would be nice.
The next step is to create transitions. Whilst the above animation will create a simple transition changing one tile to the next, we want to slide tiles in to make them look like they’re actually spinning.
The key to making successful animations, as Mark teaches us, is to consider that transitions have three parts.
- A way to add/remove a view from the screen
- the animation puts a View into the “view hierarchy” and animates it out of the view hierarchy. The animation isn’t hiding / showing the element, it’s inserting / removing a view into the view hierarchy.
- The transition modifier.
- The animation the view will use when the transition takes effect.
The above three steps are coded thus:
if condition {
    Image("apple")
        .transition(.slide)
} else {
    Image("cherry")
        .transition(.slide)
}
Here we have a conditional statement that adds/removes a view (image). Which view (image) is shown is dependent on the conditional statement.
We have the .transition modifier. And we have the animation that should be used (.slide) when the transition takes effect.
In summary, the code above slides out the previous image and slides in the new image if the condition changes.
Additional Animation
As an additional piece of animation, Mark shows us how to make the “Credits” score spring in and out as it increases and decreases in size depending upon whether the player has won or lost.
In this instance, he takes us back to the original .animation modifier, thus:
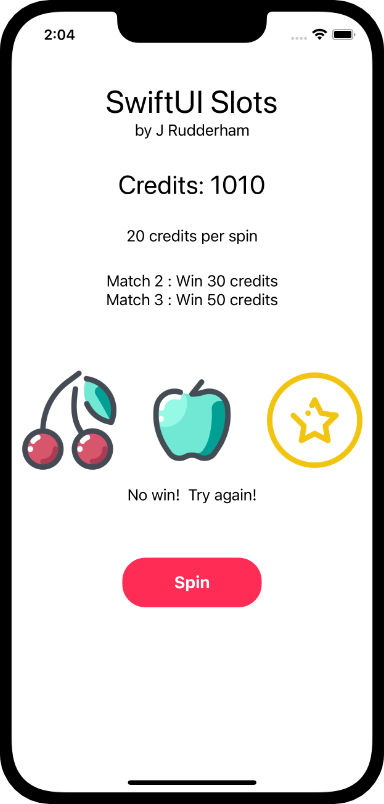
Text("Credits: " + String(credits))
    .foregroundColor(Color.black)
    .padding(.all, 10.0)
    .background(win ? Color.green.opacity(0.5) : Color.white.opacity(0.5))
    .animation(.none)
    .cornerRadius(20)
    .scaleEffect(win ? 1.2 : 1)
    .animation(.spring(response: 0.7, dampingFraction: 0.3))
We’re using the ternary operator to determine the .background() colour and .scaleEffect() dictated by the state of the variable win (which is either true or false).
However, if we use the code as Mark shows us, we’re back to the previous Xcode warning:
'animation' was deprecated in iOS 15.0: Use withAnimation or animation(_ :value:) instead.
Last time we used withAnimation but, this time, we’re going to need to use the second option animation(_ :value:). Now, this doesn’t mean anything to me, so off I go hunting the internet again.
The Apple developer documentation isn’t particularly useful in explaining how this modifier is used now, but a healthy doese of “trial and error” eventually brings us to the fairly self-explanatory:
Text("Credits: " + String(credits))
    .foregroundColor(Color.black)
    .padding(.all, 10.0)
    .background(win ? Color.green.opacity(0.5) : Color.white.opacity(0.5))
    .animation(.none, value: win)
    .cornerRadius(20)
    .scaleEffect(win ? 1.2 : 1)
    .animation(.spring(response: 0.7, dampingFraction: 0.3), value: win)
As we can see, all the error really means is that .animation needs to be tied to something that triggers the animation – in our case, the boolean win. I don’t know why errors, warnings, explanations, and examples from Apple need to be so infuriatingly cryptic but I guess they have to make coding seem as much like “arcane magic” as they can in order to maintain their titles of “Sorcerer Supreme”.
In the end we completed the animation guided by, if not taught directly, Mark Moeykens from Big Mountain Studio. Mark’s presentation style makes the journey feel painless and stress-free even when you have to go off spending hours figuring out what Apple has changed in order to achieve the same effect. We’re fortunate to have Mark on board for this journey.

