
I’ve always had a tough time explaining “relationships” between data tables when it comes to databases.
Way back when I started using them with Lotus Approach, it was simply a matter of dragging one field from one table to a related field on another table and you could immediately see the link visually (a black line linking one field name to another).
It was easy, also, to print out the entire relationship “map” (when we realised that A3 paper really was not big enough – the number of times I printed it out over multiple sheets and stuck them together to pin on the wall for reference!).
When I moved onto using MySQL / MariaDB, I just used indexes and index fields so that the query could link from one table to another. It just seemed to natural.
With Xcode, we’re back to doing it visually but only by means of the ‘Entities’ panel. To a newbie, it’s not entirely clear what you’re doing.
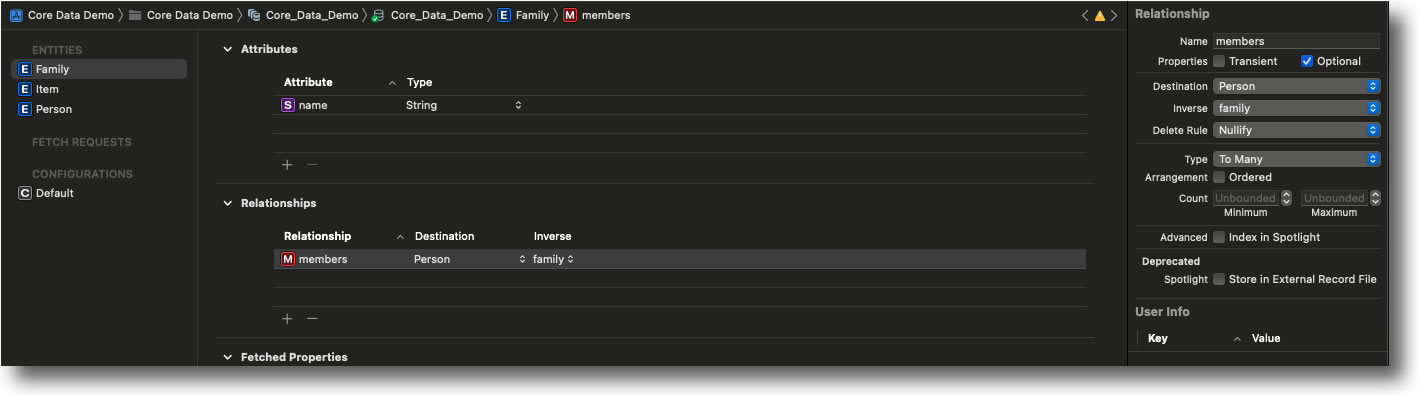
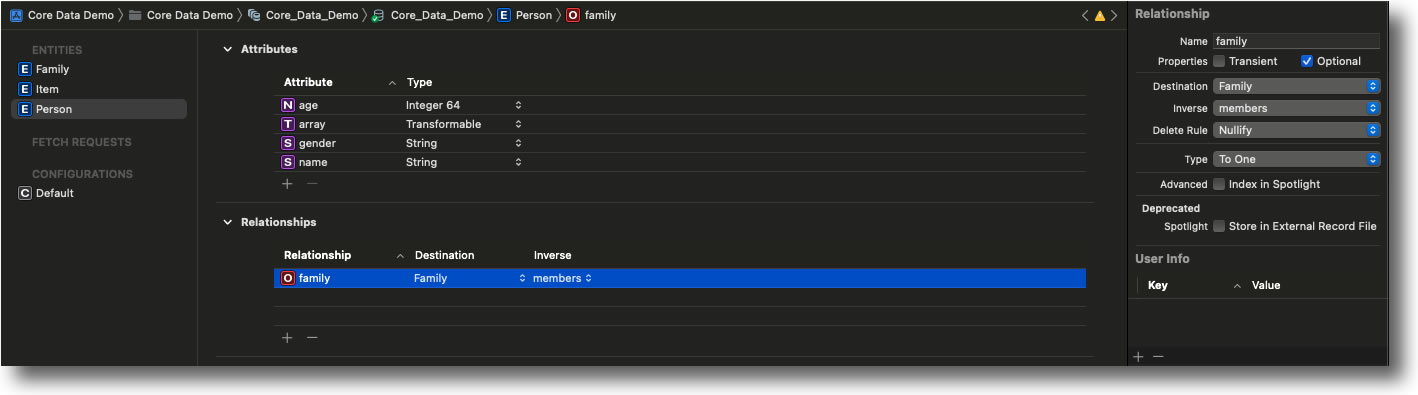
I’m sure we all recall database terminology from the old days such as “one-to-many” and “many-to-one” although I rarely thought of databases in those terms. I just used them as I needed to use them and it kind of just worked. Maybe my brain just works that way …
Here, Xcode needs us to specify the relationship in the right-side panel. The logic is obvious in that, in our example, a ‘Family’ can contain many people, but a ‘Person’ can only belong to one family. It’s great that it’s all there for us, even if it may not be entirely intuitive.
Code Examples:
@Environment(\.managedObjectContext) private var viewContext
@FetchRequest(sortDescriptors: []) var families: FetchedResults<Family>

var body: some View {
    VStack {
        Button(action: addItem) {
            Label("Add Item", systemImage: "plus")
        }
        List {
            ForEach(families) { family in
                Text("\(family.name ?? ""), member count: \(family.members?.count ?? 0)")
            }
        }
    }
}
The above code simply has a text button which calls the addItem() method when tapped, and displays a list of families beneath it.
private func addItem() {
    let family = Family(context: viewContext)
    family.name = String("Family #\(Int.random(in:0...20))")
    let numberOfMembers = Int.random(in: 0...5)
    for _ in 0...numberOfMembers {
        let p = Person(context: viewContext)
        p.age = Int64.random(in: 0...20)
        p.name = "Tom"
        p.family = family
    }
    do {
        try viewContext.save()
    }
    catch {
        // Handle potential error
    }
}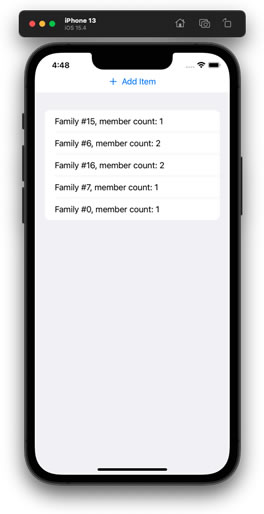
Our addItem() method creates a new family (with random number appended), in which a random number of people are added (all called ‘Tom’ – well, it’s not a very useful method but it is a fair example of what we’re doing).
The highlighted lines are where the magic works to associate the person(s) with the family, per the relationship we’ve previously established in the Entities panel.
At least, I think that’s how it works. As with everything in this iOS Databases course, it’s all a bit overwhelming but, if just small bits embed themselves in the ol’ brainbox, I hope to be on the right path.
At the end of this final lesson of module 5, Chris encourages us to do the challenge to put our recent learning into practice – only there is no challenge in this module. I guess that means I’m moving on to module 6.


