
Lesson 4 introduces us to ways of creating complex designs that incorporate gradients instead of solid colours, shadows, and blurs. Gradients is particularly complex, but only because it’s so powerful.

The challenge design/image gave plenty of scope for playing around with the various elements and modifiers, but it also incorporated a little secret “tweak” using a transparency (which doesn’t exist in the modifier). I only discovered that one on checking out the provided solution.
The solution puts the transparent colour as a constant, but I’ve included it inline in the code here for clarity:
ZStack{
    Color.black
        .ignoresSafeArea()
    ZStack {
        Circle()
            .fill(
                RadialGradient(
                    gradient: Gradient(colors: [.black, .blue]),
                    center: UnitPoint(x: 0.8, y: 0.7),
                    startRadius: 1,
                    endRadius: 350
                )
            )
        Circle()
            .fill(
                RadialGradient(
                    gradient: Gradient(colors: [.white, .init(.sRGB, red: 0, green: 0, blue: 0, opacity: 0)]),
                    center: UnitPoint(x: 0.1, y: 0.3),
                    startRadius: 1,
                    endRadius: 250
                )
            )
    }
    .padding()
    .shadow(color: .white, radius: 20, x: -8, y: -8)
    Circle()
        .fill(.yellow)
        .padding(.trailing, 200)
        .padding(.top, -500)
        .blur(radius:90)
    }
    .ignoresSafeArea()
}
I’ve highlighted how to implement transparent in the second Circle(). I’m pretty sure we’ve never covered the concept of making the background all black by just using Color.black either. Color has always been used in a modifer from what I recall.
Despite not ending up with something too close to the solution, I did enjoy the challenge because I spent time playing about with different things that the lesson had covered. I’d got the idea of using multiple circles (although not the “transparent” one because I wasn’t aware that this could be done). The trouble with this kind of experimentation, however, is that I pretty much over-thought it and was using a combination of something we had been taught in the lesson – the concept of using Gradient(stops:[]) to change the colours at various points in the gradient.
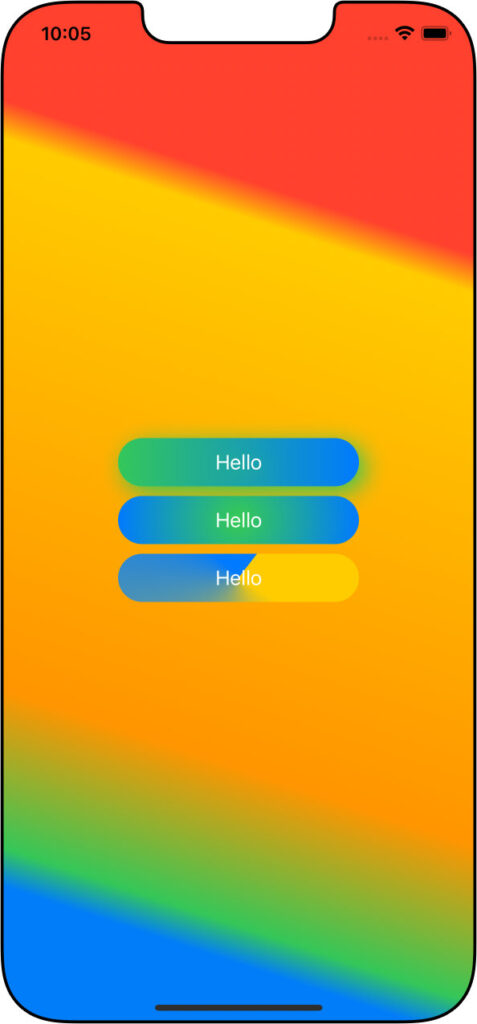
For example, this code gives the “background” effect of the Practice Lesson image:
LinearGradient(
    gradient: Gradient(stops: [
        .init(color:.yellow, location:0.05),
        .init(color:.orange, location:0.75),
        .init(color:.green, location:0.95),
        .init(color:.blue, location:1),
        ]
    ),
    startPoint: UnitPoint(x: 0.7, y: 0.2),
    endPoint: UnitPoint(x: 0.2, y: 0.9)
)
.ignoresSafeArea()
With that in my head, I used it to try and figure out the way to do the main circle. Got wayyy too far down that rabbit hole before I looked at the solution, and saw that we could use a second circle with a “transparent” part of the gradient.
It’s all part of the learning curve, I’m sure.


