
Lesson 3 of Module 6 from the CodeWithChris iOS Foundations course includes a warning to “modern” users (those using Xcode 13) regarding the dreaded “missing info.plist” problem.
Set-up
Setting up of the project uses CoreLocation, along these lines:
import Foundation
import CoreLocation

class ContentModel: ObservableObject {

    var locationManager = CLLocationManager()

    init() {
        locationManager.requestWhenInUseAuthorization()
    }
}
Running the Simulation
If you run the build in Xcode 13.2.1 (which is what I’m using), the simulation fails with this error:
2022-03-11 13:41:36.010367+0000 M6-CitySightsApp[5777:156670] This app has attempted to access privacy-sensitive data without a usage description. The app’s Info.plist must contain an “NSLocationWhenInUseUsageDescription” key with a string value explaining to the user how the app uses this data
Xcode 13.2.1
It’s clear enough, except that Xcode 13.2.1 does not have an “Info.plist” file. As near as I can tell, there is no setting anywhere in any tab that allows you to add a ‘NSLocationWhenInUseUsageDescription’ key.
If you create an Info.plist file (there are a number of ways of doing this), and then add the key and run the build, Xcode 13.2.1 then fails the simulation with this error:
duplicate output file ‘/Users/…/Library/Developer/Xcode/DerivedData/M6-CitySightsApp-bzsrbsbedgfeluejtjqoqawqsnkr/Build/Products/Debug-iphonesimulator/M6-CitySightsApp.app/Info.plist’ on task: ProcessInfoPlistFile /Users/…/Library/Developer/Xcode/DerivedData/M6-CitySightsApp-bzsrbsbedgfeluejtjqoqawqsnkr/Build/Products/Debug-iphonesimulator/M6-CitySightsApp.app/Info.plist /Users/…/Sync/My Learning/CWC+/02 – iOS Foundations 2021/modules/Module 06 – City Sights App/M6-CitySightsApp/M6-CitySightsApp/Info.plist
Xcode 13.2.1
The key notes to take away from here are:
- A location “key” needs to be added to a file that doesn’t exist;
- If you create the file to add the “key”, you’re told you’ve created a duplicate of that file that didn’t exist before.
Non-Solution
The instructions given beneath the CodeWithChris tutorial video involve following steps by visiting an off-site website, which would be fine except that said website only displays the first paragraph before insisting on you logging in through Facebook or Google. This shouldn’t be necessary, surely?
I don’t like signing up to unknown third-party sites but after scouring the web with little success and believing that this “official link” would lead to the correct solution, I, reluctantly, signed in to the third-party site – but it turns out that it provides just the same information as elsewhere that doesn’t really help if you’re a newbie like me.
It quotes the ‘official’ line to go to Project > Targets > Info [tab] > Custom iOS Target Properties (the top bit of the window), and then “edit the properties, just like you would’ve back in Info.plist”.
First, I’ve never used a previous version of Xcode nor any Info.plist before, so there’s no “just like…” here to fall back on.
Secondly, we’re supposed to be doing something with a “NSLocationWhenInUseUsageDescription” key, and just saying “edit the properties” when there is no such property to “edit” is not helpful at all.
Thirdly, shortly after signing up to this “free” site I get spammed from the site with an email about news headlines, and then pushing me to be a paid member. So now I’ll have to waste time deleting all of that rubbish. Thanks!
So far, I’ve had this tutorial video on pause for well over 2 hours as I try to locate a solution to something that should be part of the course – if not the video itself, then a solution that doesn’t require clicking through to third-party sites, signing up to them, then having to scour the internet and forums anyway.
This is not turning out to be a day of good experiences.
A Solution That Works
Okay, so I’ve deleted all the work done on this project so far and created it again from scratch in the hope that I can reproduce – in simple terms – the steps required just to add this one single setting into the Xcode 13.2.1 project.
Step 1
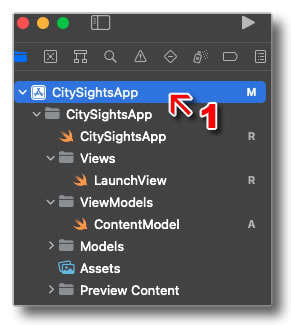
Click on your project name in the Project Navigator of Xcode (see image on the right).
The main area of Xcode will show several tabs across the top including ‘General’, ‘Resource Tags’, ‘Info’, ‘Build Settings’, ‘Build Phases’, and ‘Build Rules’.
Step 2
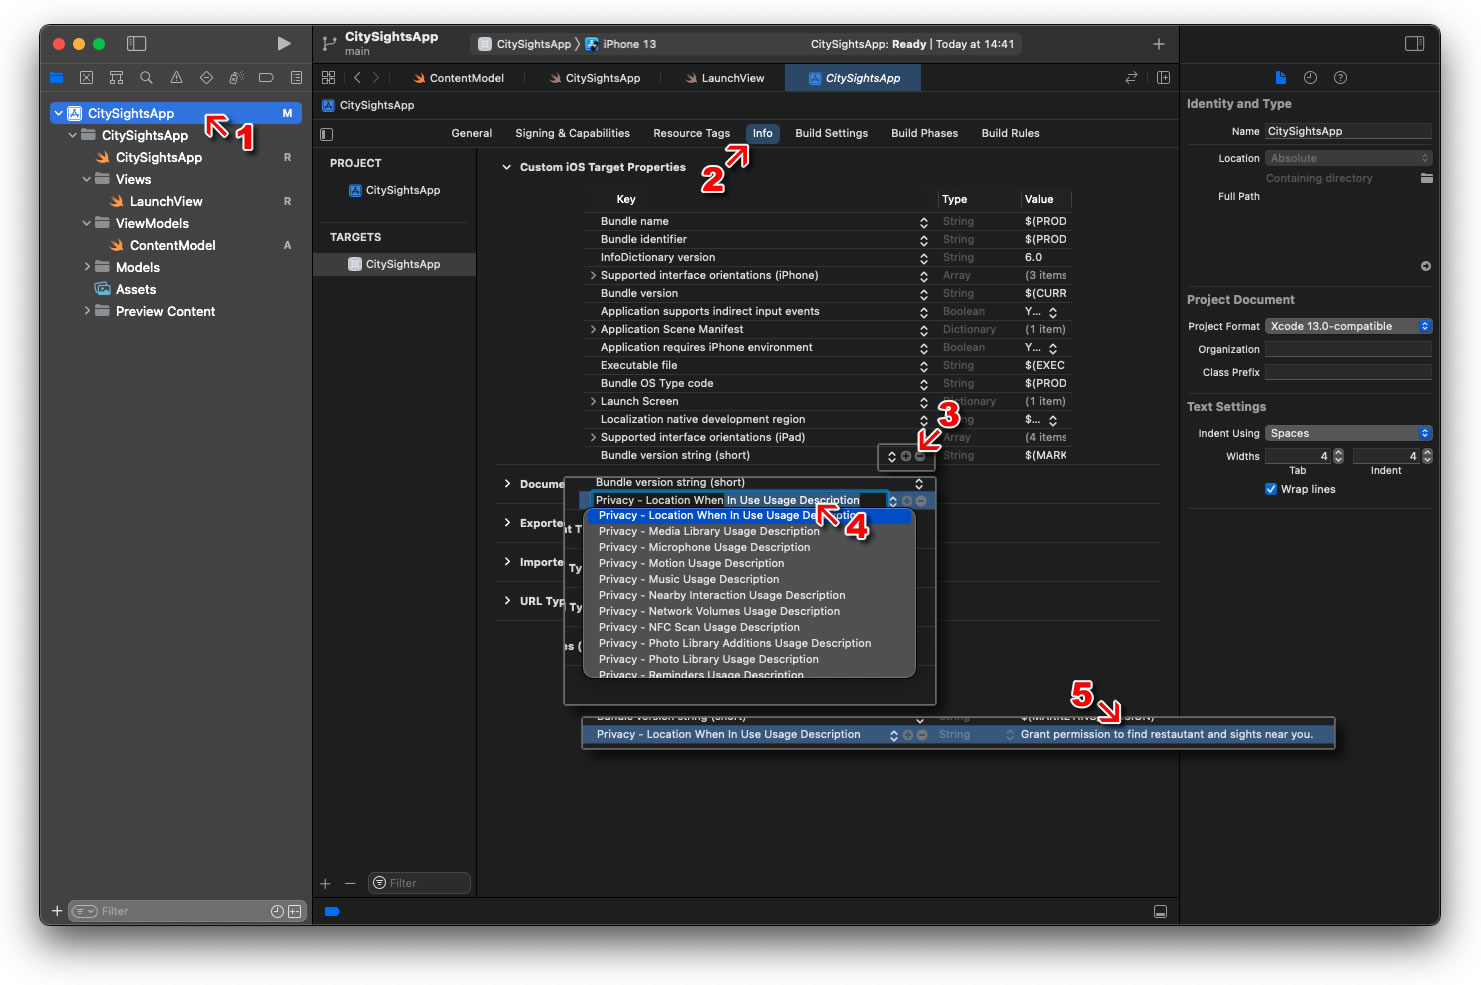
Click on the Info tab.
At this point, most of the “helpful advice” I’ve read says “edit the properties” but, as you’ll see, there is no property for the key we’re missing.
Other “helpful advice” says to edit “as usual”, but there is no “usual” to a newbie.
What you need to do is not intuitive at all. There’s no “add” button or “+” sign to add a new key. Nothing. So what are you supposed to do?
Step 3

If you move your mouse pointer down that list of up/down arrows, you’ll see that a + and – symbol appears next to the arrows on the line your pointer hovers over. You’d think this was to add or remove a setting to the current key but, non-intuitively, you can actually add a new key using the same symbol/button.
I’m not sure how a newbie is supposed to know this.
So, at this stage, just click the + symbol.
Step 4

A new blank key will appear from which you can select from those offered.
If you start typing the one we want “Privacy – Location When In Use Usage Description” (as mentioned in the tutorial video), you’ll locate it quicker.

Step 5
In the right-most column (after where it says “String”), double-click and start typing the description you want to be displayed when permissions are requested. An example might be: “Grant permission to find restaurants and sights near you”.
Save the project.
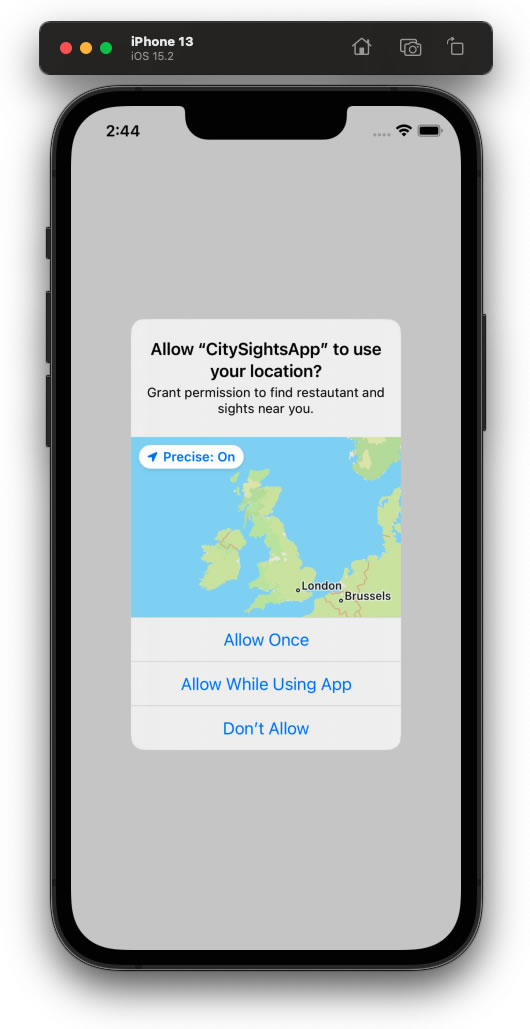
Now, when you run the simulator, the build should succeed and you should get the permission request page.
Conclusion
When broken down into these steps, the solution to the missing key and the lack of an Info.plist file is remarkably simple and straightforward. Yet it’s taken me the best part of three hours scouring the web, piecing together what others have said, trial-and-error through my own project, all to bring it all together for this simple and straightforward solution.
Coding can be a crazy world sometimes!

